How to Get a Drip Effect on a Cake

Make a 1:1 dark chocolate ganache by weight, let it cool to about 90°F (32°C) so it moves like warm honey, and pour it onto a cake that has been chilled until the frosting is firm to the touch. Then test one single drip on the back of the cake before you commit to the whole rim. That is the entire method.
Everything that goes wrong with drips is a temperature problem wearing a costume. Too warm and the ganache sheets down the side and pools on the board. Too cool and it stops half an inch down in a fat blob. The ratio gets you in the right neighborhood, and the two temperatures, ganache and cake, do the actual work.
Learning how to get a drip effect on a cake is mostly learning to be patient with a bowl of ganache while it cools, which is a skill nobody advertises.
Not sure how much to make? Our free frosting calculator gives coating weights by cake size, and a drip uses the same numbers as a thin ganache coat with a little to spare.
Updated September 2026
The two temperatures that decide everything
There are only two numbers in this whole technique, and they pull in opposite directions.
The ganache needs to be warm enough to flow but cool enough to have body. For a dark chocolate 1:1, that window sits at roughly 88°F to 92°F (31°C to 33°C). Dip a spoon in and lift it: at the right temperature the ganache falls in a thick ribbon that takes a second to sink back into the bowl. If it runs off the spoon like chocolate milk, it is still too hot. If it drops off in a lump, it has gone too far.
The cake needs to be cold and firm, not frozen. Pull it from the fridge after 20 to 30 minutes, long enough that the buttercream does not dent under a fingertip. A cake straight out of the freezer is a trap. The ganache hits that surface, seizes instantly, and every drip stops in a stubby little tab about a quarter inch below the rim. It looks nothing like the photo you were copying.
Here is the same set of temperatures in both scales, since half the guidance online is written in Celsius.
| What | Fahrenheit | Celsius | How it feels |
|---|---|---|---|
| Melting limit, dark chocolate | 120°F | 49°C | Any hotter and it scorches |
| Melting limit, milk and white | 110°F | 43°C | These burn much sooner |
| Ganache too hot to pour | 100°F+ | 38°C+ | Runs straight to the board |
| Drip window, dark 1:1 | 88 to 92°F | 31 to 33°C | Thick ribbon off a spoon |
| Drip window, white 3:1 | 85 to 88°F | 29 to 31°C | Slightly cooler, it is looser |
| Ganache setting up | Below 82°F | Below 28°C | Blobs, not drips |
| Chilled cake surface | About 40°F | About 4°C | Firm, no fingertip dent |
Our free oven temperature converter will flip any of these both ways if you work in Celsius.
Ganache ratios by chocolate type
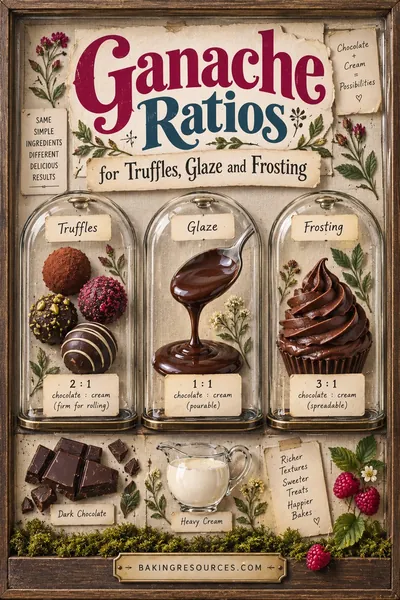
Ganache is chocolate to cream by weight, never by volume, and the ratio changes with the chocolate because milk and white chocolate carry a load of sugar and milk solids that never set firm.
| Chocolate | Drip ratio (chocolate:cream) | Notes |
|---|---|---|
| Dark, 55 to 70% | 1:1 | The default. Sets glossy and firm |
| Semisweet chips | 1:1 | Chips hold their shape on purpose, so melt gently |
| Milk chocolate | 2:1 | Half the cream, or it never sets |
| White chocolate | 3:1 | The most forgiving to color, the fussiest to melt |
| Candy melts | Melts plus a splash of cream or oil | Not real ganache, but it drips |
Those are the same figures our ganache ratio guide uses for glazes, and a drip is just a glaze with somewhere to fall. Push a dark ganache to 2:1 and you get something stiff and spreadable that will not drip at all, no matter how warm you make it.
One thing worth knowing before you start: a drip does not need tempered chocolate. The cream in ganache changes the game entirely, so you can skip the whole tempering process. What you cannot skip is melting it gently, because scorched chocolate goes grainy and grainy ganache drips in ugly lumps. If chips are what you have, our guide to melting chocolate without seizing it covers the microwave method in 20 second bursts.
How to get a drip effect on a cake, step by step
- Chill the cake. Finished frosting, smooth sides, 20 to 30 minutes in the fridge. Firm to the touch, not frozen solid.
- Weigh the chocolate and cream. Same weight for dark, twice the chocolate for milk, three times for white. A scale is not optional here.
- Heat the cream until it steams and you see small bubbles at the edge of the pan. It does not need to boil.
- Pour the cream over the chopped chocolate and leave it alone for 2 minutes. No stirring. Let the heat do its work.
- Stir from the center outward with a spatula until it turns from a mottled mess into one glossy emulsion. It looks broken right up until it doesn't.
- Let it cool. This is the step everyone rushes. Ganache made with hot cream starts near 110°F and needs 15 to 25 minutes on the counter to reach the drip window. Stir it every 5 minutes so it cools evenly.
- Test one drip. Spoon a little over the back edge of the cake and watch it for 30 seconds.
- Adjust, then commit. Warm it 5 seconds in the microwave if the test stopped short, or wait 3 more minutes if it ran to the board.
- Work the rim with a spoon or a squeeze bottle, one drip at a time, spacing as you go.
- Flood the top with the rest and spread it to meet the drips.
- Chill 10 minutes to set the drips before you add anything on top.
A worked example: an 8 inch two layer cake
Say you have an 8 inch round, two layers, buttercream finished, and you want dark chocolate drips.
Make 150 g dark chocolate plus 150 g heavy cream, which gives 300 g of ganache. You will use somewhere around half of that on the drips and the top flood, and the rest is your margin for the test drip and the batch you overheat and have to wait on.
If you are measuring by volume instead of weighing, our ingredient weights chart puts chocolate chips at 170 g per cup and heavy cream at 238 g per cup. So:
- 150 g of chips is a scant 7/8 cup, or a hair under half of a 12 oz bag (that bag is 340 g)
- 150 g of cream is 0.63 cups, which is about 10 tablespoons
The volume route works, but it is genuinely worse. Chips settle differently every time you scoop them, and being 20 g out on a 300 g batch shifts the ratio far enough to change how the drips behave. A kitchen scale beats measuring cups by a wide margin for anything where the ratio is the recipe.
Scale that starting weight up or down with the cake:
| Cake size | Dark chocolate | Heavy cream | Total ganache |
|---|---|---|---|
| 6 inch round | 100 g | 100 g | 200 g |
| 8 inch round | 150 g | 150 g | 300 g |
| 9 inch round | 175 g | 175 g | 350 g |
| 10 inch round | 225 g | 225 g | 450 g |
| Two tier, 6 and 8 inch | 250 g | 250 g | 500 g |
Making extra is the right call. Ganache keeps two weeks in the fridge, reheats in a warm water bath, and a bowl that is too shallow cools unevenly and skins over at the edges while the middle is still hot.
Controlling drip length and spacing
Drip length comes from three things: how much ganache you push over the edge, how cold the cake is, and how long you wait before the ganache sets.
Volume is the main lever. A half teaspoon over the rim gives you a drip about an inch long on a chilled cake. A full teaspoon runs two to three inches. Once you have your test drip, you know the conversion for your particular batch.
Spacing is a rhythm, not a measurement. Place a long drip, then a short one, then a medium one, then leave a gap wider than you are comfortable with. Evenly spaced identical drips read as machine made and, oddly, look worse. Aim for a long drip roughly every 2 to 3 inches on an 8 inch cake, so around 8 to 10 long ones total, with shorter ones filling between.
Work around the cake in one direction and do the full rim before you flood the top. If you flood first, the top layer of ganache pushes over the edge on its own schedule and you lose all control of length.
A squeeze bottle gives the cleanest results because you control flow with pressure instead of gravity. A spoon works fine. What does not work is pouring from the bowl and hoping.
Fixing drips that ran, stalled or dragged
They ran all the way to the board. The ganache was too warm, the cake was not cold enough, or both. Wipe the board, chill the whole cake 15 minutes, then go back over the ruined section with a slightly cooler ganache. Drips hide under drips remarkably well.
They stopped an inch down in fat blobs. Too cool, or the cake was frozen. Microwave the ganache 5 seconds, stir, and test again. If the cake is the problem, let it sit out 10 minutes.
The drips are dull, not glossy. The ganache got too hot at some point and the cocoa butter separated. Stir in a teaspoon of warm cream and it usually comes back. If it stays dull and slightly gray on the surface, that is bloom and you overheated the chocolate past its limit.
The drips dragged crumbs down with them. The frosting underneath was too soft. Chill harder next time. Our guide on frosting a cake covers the crumb coat that prevents this.
The ganache split into a greasy, grainy mess. Add a tablespoon of warm cream and whisk hard from the middle. If that fails, blitz it with an immersion blender, which fixes about 90 percent of broken ganache.
The drips slid off entirely after chilling. Condensation. The cake went into a humid fridge, water beaded on the ganache, and it lost its grip. Cover the cake loosely while it chills.
White, milk and colored drips
White chocolate is the one people reach for when they want color, and it is the one that punishes carelessness.
Its melting limit is around 110°F, roughly 10 degrees lower than dark, and past that it turns into a thick, sandy paste that no stirring recovers. Use a 3:1 ratio, melt it in short bursts, and pull it off the heat while lumps are still visible.
Color it with gel or oil based coloring only. Water based liquid coloring seizes white chocolate on contact, the same way a drop of water does. A drip is mostly chocolate, so it behaves like chocolate. Our comparison of gel and liquid food coloring explains why the water content matters so much.
White chocolate ganache also drips at a slightly lower temperature, around 85°F to 88°F, because it stays looser at any given temperature than dark does. Test drips matter even more here.
Milk chocolate sits between the two: 2:1, a melting limit near 110°F, and a drip window close to dark chocolate's. It also sets softer, so milk chocolate drips stay slightly tacky at room temperature. On a cake being served the same day that is fine. On a cake traveling in a car in October, it is not.
For a quick color reference on which chocolate does what, our types of chocolate breakdown covers cocoa butter percentages, which is really what drives all of this.
Timing, transport and storage
Drips set firm in about 30 minutes at room temperature and about 10 minutes in the fridge. Once set, they are stable enough to hold sprinkles, chocolate shards or a border of piping.
Do the drips the day before if you need to. They hold their shape overnight in the fridge under a loose cover. Take the cake out about an hour before serving so the ganache comes back to room temperature and the shine returns.
Cold drips look matte. That is normal and it reverses as the cake warms. Do not panic and reheat anything.
Transporting a drip cake is easiest when the ganache is fully chilled and firm. A set dark chocolate drip survives a car trip. A milk chocolate one gets soft, and a white chocolate one gets soft faster. Keep the cake box out of direct sun and off a heated seat.
For longer storage the usual rules apply, and our guide to storing cake covers how long a frosted cake actually keeps before the crumb turns dry.
Common questions about cake drips
What ganache ratio is best for drips?
For dark chocolate, 1:1 by weight is the standard drip ratio, and it is what our ganache ratio guide recommends for glazes too. Milk chocolate needs 2:1 and white chocolate needs 3:1, because their sugar and milk solids never set as firm as cocoa solids do.
Why does my drip run all the way down the cake?
The ganache was above about 95°F when it hit the cake, or the cake was not chilled. Wait 5 more minutes, stir, and test a single drip on the back before you do the rest. A drip that runs to the board is almost never a ratio problem.
Can I make a drip cake without a scale?
You can, but the results get inconsistent. Chocolate chips are 170 g per cup and heavy cream is 238 g per cup, so a 1:1 ganache in volume terms is roughly 1 cup of chips to 0.7 cups of cream. Our ingredient weights chart has the full density list if you want to work that way.
How long do drips take to set on a cake?
About 30 minutes at room temperature or 10 minutes in the fridge for dark chocolate. Milk and white chocolate take longer and stay softer even once set, because they carry less cocoa solid.
Do I need to temper chocolate for a drip?
No. The cream in ganache changes how the cocoa butter crystallizes, so tempering is not part of the process. You still need to melt gently, which is a different problem. See how to melt chocolate for the temperature limits.
Why did my white chocolate drip turn thick and grainy?
You went past about 110°F, which is where white chocolate scorches, or a drop of water got in. Both produce the same sandy texture. Melt white chocolate in 15 second bursts and stir between each one, and never add water based food coloring to it.
Can I use candy melts instead of ganache for drips?
Yes, and they are more forgiving about temperature. Thin them with a little neutral oil rather than cream. The tradeoff is flavor and finish: candy melts taste waxier and set harder, so they crack rather than yield when the cake is cut.
How much ganache do I need for a 9 inch drip cake?
Make 175 g of chocolate and 175 g of cream, which gives 350 g total. You will use roughly half on the drips and the top flood. Our frosting calculator gives coating weights for other sizes, and ganache follows the same coverage numbers as a thick buttercream coat.